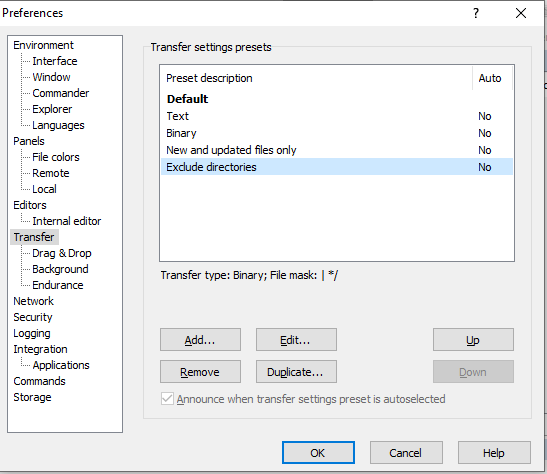
The Transfer Page under the Preferences Dialog allows the users to configure all the default transfer settings and the transfer settings presets. This also includes the rules of Auto selection.

There are three more transfer options available when you open its subpages; these are below
- Drag & Drop
- Background
- Endurance
For further details, please refer to the following points/documentation of the transfer page sections
- Default Transfer Settings
- Transfer Settings Presets
- Further Reading
-
Default Transfer Settings
- If you want to view the default transfer settings, you can select the first “Default” item in the list in the upper part of the current page. After the selection, the entire configuration settings will be shown below the list.
- In case you want to change the settings, you can use the “Edit” button, which will show the “Transfer Settings” dialog. You can also click on the “Transfer Settings” Dialog box, it an alternative option.
- Note: You cannot reorder nor delete the transfer settings, which are listed as default.
-
Transfer Settings Presets
- The upper part’s list of the page will show you the configured transfer settings and the presets in a similar order like the used to appear in the menus. (Example– The transfer settings toolbar).
- The order is equally important when you evaluate the Auto-selection rules (The “First Matching” presets always wins)
- Initially, you will see the list, which contains some set of example presets. Here are some of the examples-
- The “Column Preset Description” will show you the name of the preset as it will appear in the menus. The column will indicate automatically if there is an Auto selection rule, which is associated with preset.
- You can use the button “Add” if you want to add the preset. After adding it, you will see the dialog of transfer settings preset editor.
- The preset, which is added newly, will be inserted just before the preset, which is selected in the list or it will be inserted at the end if you have not selected any preset.
- The button ‘Edit” will help you to edit the selected preset. The edit option will open the “Transfer settings preset editor” dialog.
- Use the button “Remove” if you want to remove the preset, which is selected. You can always have the option the cancel the action any time if you have done this by mistake. This step will be applied to the entire Preferences Dialog, and you can undo all changes you have made.
- The “Duplicate” button can be used to duplicate the selected preset. The dialog of transfer settings preset editor will be shown, where you will be required to provide a name to the present, which is duplicated. You can change these settings anytime if you want.
- You can use the buttons “Up and Down” if you want to change the preset’s order. The order is equally important when you evaluate the Auto-selection rules (The “First Matching” presets always wins).
- The preset setting “Announce when transfer” it an autoselected checkbox, which makes the box pop up of announcement whenever you change transfer settings due to the rule of Auto selection.
- If you turn off this option, you will still see the announcements messages on the main window’s status bar.
- In case there is not preset along with the Auto-selection rule, the checkbox will remain disabled.