In the previous guides of NeoFilm, we have seen plenty of steps of how you can add and mix the background music using the NeoFilm video editing software. In all guides, we have noticed that we did not cut the tracks at the end of the video track itself. Air is a reason behind this process that the shape of the music is track matters at this point, and it has also provided us with the idea of how you can fade using the filter applied. Therefore the final version of the video would be ideal in terms of background music while the video is closing.
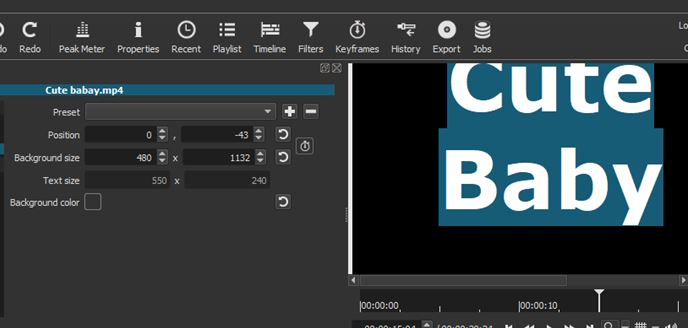
As a technical term, we can assume that whatever we have learnt in the past guide of adding and mix in background music can have a closing sequence of the video. Hair we can also import the transparent background image in our video project, also so we can append the same at the end of the video track. In addition, we can also add a text filter into the video using any text like your name, the file name, or the scene, which is going to be played in the video.
In this guide, we are going to describe a new method of adding and mixing background music tour video file.
- First, you can decide over here whether you want it a dissolve transition from the end-note of the video or you want to apply a fade to black filter into to clip or segment at the end of your video.
- You can follow the entire process by using a short blank segment of your transparent background picture.
- Now, you will have to follow that one with along a segment in which you have applied your text filter, which is correctly measured and placed.
- Now, your fade in and fade out filter has been applied.
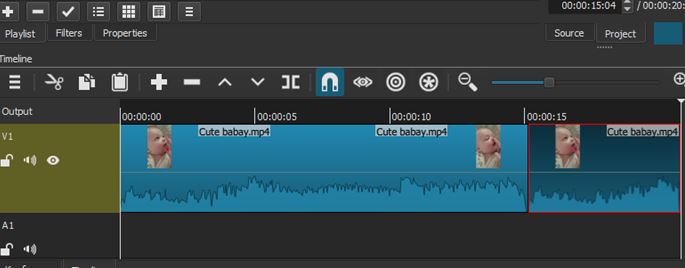
- You can see the results of the steps by navigating the timeline also so you can zoom it out so that you will be able to see more details in the ending sequence of your video.
- Now you can see all the three failed filters which you have applied; the first one is fade out, which is added into to the brief and the and segment of your video
- The second and the third one are applied in the last portion of the transparent image segment, which is longer and also so it has the text filter.
In above all the three steps, we have extended the duration of all faith filters, which is the default from one second to almost 1:20 seconds. Now, if you try to back up your play had to the midpoint of the last filter, you can see your end title/ credit text, which is available in the mid-fade-out of your screen:
By following all the steps carefully, we have now a completely e beautiful sequence of ending. Here one exception is that your video track ok is carrying the complete length of the end credit sequence also, so it ends abruptly.
- Here you need to fade it out instead. In general, words, we can say that as you apply the process with the video file, you can also follow the same for the audio file if you want to define a segment, or it will be e applied to the entire audio track.
- However, there is no issue if you are applying a fade out option in the audio filter because if you are applying it to all three audio tracks, it will create effects and will work backwards from the available Endpoint.
- What you need to do is simply adjust the duration of fade as default, and with the video, you can make it fade out, and the duration should be 1 second.
- However, this is quite short for your background adding purpose so you can adjust it according to your needs.
- After following all the steps, you can increase the duration to 5 seconds which at the value of the slow faith throughout the entire duration of your and credit visual.
As of now, the visible co-relative option is not available in the NeoFilm video editing software in the timeline, so that’s it in this guide off adding, and mixing background music using NeoFilm. We hope you will try the options fade in and fade out and all the filters applied in the very first panel of all the videos.